Creating a flower arrangement is like painting with nature’s palette—vibrant, rewarding, and deeply personal. Whether you’re preparing a centerpiece for a dinner party, a bouquet for a loved one, or simply brightening your home, arranging flowers is an art form anyone can master with a little guidance. This step-by-step guide will walk you through the process, from choosing the right blooms to crafting a stunning display, ensuring you feel confident and inspired. Let’s dive into the world of floral design with practical tips, real-world examples, and a touch of creativity to make your arrangements bloom.
Why Learn Flower Arranging?
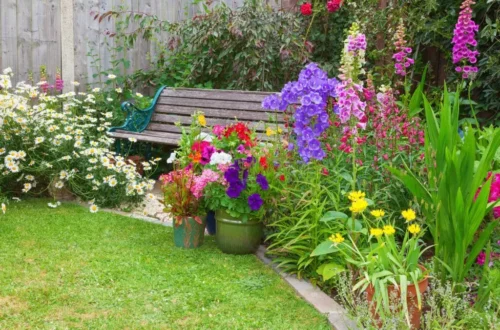
Flower arranging is more than just placing blooms in a vase—it’s a creative outlet that brings joy and beauty to any space. It’s a skill that blends aesthetics with emotion, allowing you to tell a story through color, texture, and form. Whether you’re a hobbyist or aspiring florist, mastering this craft can elevate special occasions or simply make everyday moments feel extraordinary.
Step 1: Gather Your Supplies
Before you start arranging, you’ll need the right tools and materials. Having everything ready ensures a smooth process and lets your creativity flow without interruptions. Think of it as prepping your kitchen before cooking a meal—organization is key.
Essential Tools for Flower Arranging
You don’t need a professional florist’s toolkit to get started, but a few basics will make the process easier. Here’s what you’ll need:
- Vase or container: Choose one that complements your vision—wide for low centerpieces, tall for dramatic displays.
- Floral shears or scissors: Sharp, clean cuts are crucial for flower health.
- Floral foam or frog: These help anchor stems and maintain structure.
- Floral tape: Useful for securing foam or creating grids for stability.
- Water with flower food: Prolongs the life of your blooms.
- Optional: Gloves (for thorny stems like roses) and a bucket for soaking flowers.
Where to Get Supplies
You can find floral supplies at local craft stores like Michaels, online retailers like Amazon, or even your local florist. For budget-friendly options, check dollar stores for vases or thrift shops for unique containers. Flower food packets are often included with store-bought bouquets, but you can also make your own by mixing 1 tsp sugar, 1 tsp bleach, and 2 tsp lemon juice per liter of water.
Step 2: Choose Your Flowers
Selecting the right flowers is the heart of any arrangement. I remember my first attempt at arranging flowers for a friend’s baby shower—I was overwhelmed by choices at the market! The key is to pick blooms that work together in color, texture, and size while considering the occasion and season.
Types of Flowers to Include
A balanced arrangement typically includes three types of flowers:
- Focal flowers: Bold, eye-catching blooms like roses, peonies, or sunflowers.
- Filler flowers: Delicate flowers like baby’s breath or wax flowers to add volume.
- Greenery: Leaves or ferns like eucalyptus or ivy for texture and contrast.
Here’s a quick comparison table to help you choose:
| Flower Type | Examples | Best For | Pros | Cons |
|---|---|---|---|---|
| Focal Flowers | Roses, Lilies, Dahlias | Main attraction | Vibrant, bold | Can be pricey |
| Filler Flowers | Baby’s Breath, Statice | Adding volume | Affordable, delicate | May overpower if overused |
| Greenery | Eucalyptus, Ferns | Texture and balance | Long-lasting, versatile | Can look messy if not trimmed |
Tips for Choosing Flowers
- Seasonality: Opt for seasonal flowers to save money and ensure freshness. For example, tulips in spring or chrysanthemums in fall.
- Color Palette: Stick to complementary colors (e.g., reds and greens) or monochromatic schemes for elegance.
- Longevity: Choose hardy flowers like carnations or alstroemeria for arrangements that last longer.
You can source flowers from local markets, grocery stores, or even your garden. For special occasions, consider wholesale florists or online services like FiftyFlowers for bulk orders.
Step 3: Prepare Your Flowers
Proper preparation ensures your flowers stay fresh and vibrant. I learned this the hard way when I once skipped trimming stems, and my bouquet wilted in two days! Taking a few minutes to prep can make all the difference.
How to Prep Flowers
Start by filling a clean bucket with lukewarm water and flower food. Then, follow these steps:
- Trim stems: Cut 1–2 inches off each stem at a 45-degree angle to maximize water absorption.
- Remove lower leaves: Strip leaves below the waterline to prevent rot.
- Soak flowers: Place stems in the bucket for at least an hour to hydrate.
This step is crucial for maintaining flower health, especially for delicate blooms like hydrangeas, which can droop if not properly hydrated.
Step 4: Plan Your Design
Before placing a single stem, visualize your arrangement’s shape and style. Are you going for a lush, romantic look or a minimalist, modern vibe? Planning helps you avoid a chaotic mess and ensures a cohesive design.
Popular Arrangement Styles
- Round: Symmetrical and full, ideal for centerpieces.
- Asymmetrical: Organic and loose, great for casual settings.
- Tall and Dramatic: Perfect for events, with long stems in tall vases.
- Low and Sprawling: Best for dining tables, keeping sightlines clear.
Sketch your design or mentally map out the placement of focal flowers, fillers, and greenery. For example, a round centerpiece might have peonies in the center, surrounded by baby’s breath and eucalyptus.
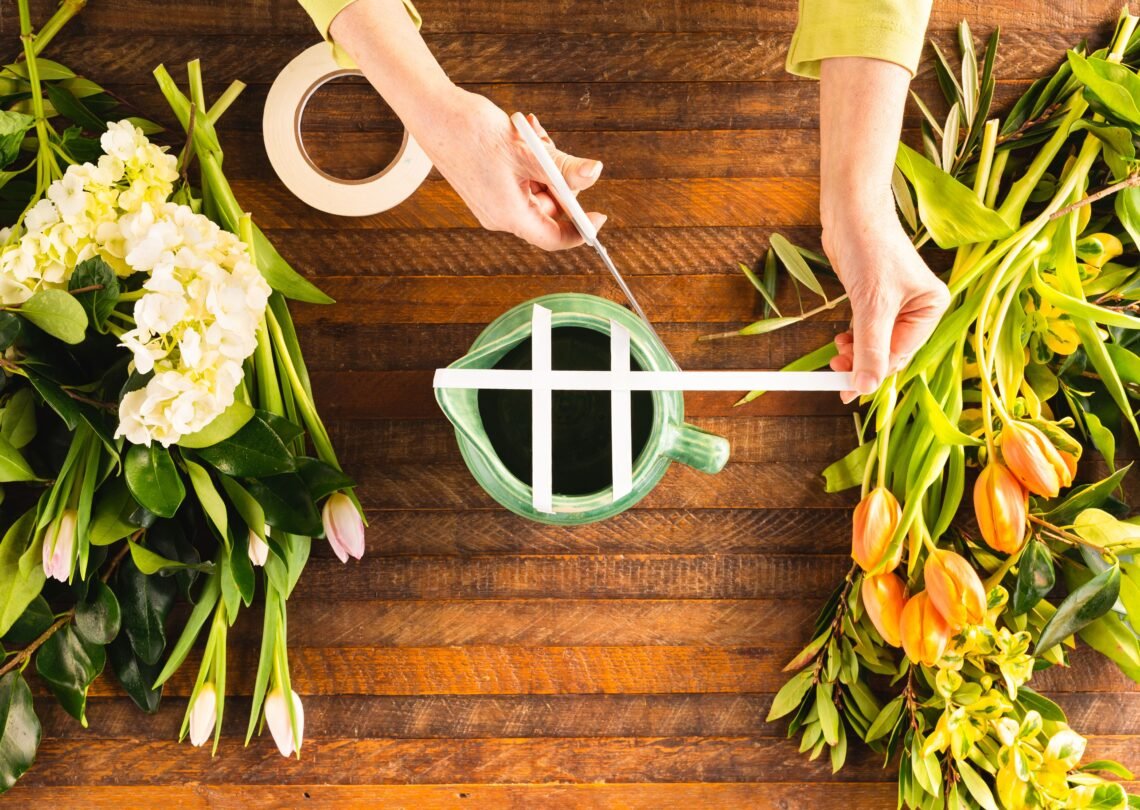
Step 5: Build the Base
The base of your arrangement provides structure and stability. This is where floral foam, frogs, or tape come in handy. Think of it as laying the foundation for a house—get it right, and everything else falls into place.
Setting Up the Base
If using floral foam, soak it in water for 10–15 minutes, then secure it in the vase with floral tape. For a frog, place it at the bottom of the vase and fill with water. If you prefer a freeform look, create a grid with floral tape across the vase’s opening to hold stems in place. This step ensures your flowers stay where you want them without toppling over.
Step 6: Arrange the Greenery
Greenery sets the stage for your flowers, adding texture and depth. I once made a mistake of skipping greenery, and my arrangement looked flat—don’t make the same error!
How to Add Greenery
Insert greenery stems into the foam or grid, angling them to create a natural, flowing shape. Use sturdy leaves like eucalyptus to form a loose framework, ensuring some pieces drape over the vase’s edge for softness. Rotate the vase as you work to maintain balance from all angles.
Step 7: Place Focal Flowers
Focal flowers are the stars of your arrangement, drawing the eye with their size and color. This is where your creativity shines, but placement matters to avoid a lopsided look.
Arranging Focal Flowers
Insert focal flowers into the foam or grid, spacing them evenly to create a focal point. For example, place three roses in a triangular pattern for a round arrangement. Keep stems at varying heights for depth, and step back frequently to check the overall effect. If you’re using bold blooms like sunflowers, one or two might be enough to make a statement.
Step 8: Add Filler Flowers
Filler flowers add volume and soften the arrangement, like icing on a cake. They bridge the gaps between focal flowers and greenery, creating a cohesive look.
Incorporating Fillers
Tuck filler flowers like baby’s breath or statice between the focal flowers and greenery. Use them sparingly to avoid overwhelming the design. For a romantic vibe, let some fillers trail over the vase’s edge. Check for balance by viewing the arrangement from different angles.
Step 9: Fine-Tune the Arrangement
Now that your flowers are in place, it’s time to refine the details. This step is like editing a story—small tweaks can elevate the final product.
Tips for Fine-Tuning
- Check proportions: Ensure no single flower or section dominates.
- Adjust heights: Vary stem lengths for a natural, dynamic look.
- Fill gaps: Add extra greenery or fillers where needed.
- Clean up: Remove any stray leaves or petals from the vase.
Step back and view your arrangement from a distance. If it feels balanced and visually appealing, you’re on the right track.
Step 10: Care for Your Arrangement
A beautiful arrangement deserves to last as long as possible. With proper care, you can enjoy your creation for days or even weeks.
Flower Care Tips
- Change water every 2 days: Add fresh flower food each time.
- Re-trim stems: Cut 1/4 inch every few days to maintain water uptake.
- Keep cool: Place the arrangement away from direct sunlight or heat sources.
- Remove wilted blooms: This prevents bacteria from spreading.
I once kept a carnation arrangement alive for nearly three weeks by diligently changing the water and trimming stems—patience pays off!
People Also Ask (PAA)
Here are answers to common questions about flower arranging, sourced from Google’s “People Also Ask” section:
How do you arrange flowers in a vase for beginners?
Start with a clean vase and floral foam or a frog for structure. Add greenery first to create a base, then place focal flowers for impact, and finish with fillers for volume. Trim stems at a 45-degree angle and change the water every two days to keep the arrangement fresh.
What are the basic rules of flower arrangement?
Balance, proportion, and color harmony are key. Use a mix of focal flowers, fillers, and greenery, and vary stem heights for depth. Ensure the arrangement looks good from all angles, and choose a container that complements the flowers’ style and size.
How do you make a homemade flower arrangement?
Gather a vase, floral shears, and fresh flowers. Prep flowers by trimming stems and removing lower leaves. Build a base with greenery, add focal flowers, and fill gaps with fillers. Use floral foam or tape for stability, and maintain the arrangement with fresh water and food.
What are the best flowers for a DIY arrangement?
Roses, carnations, and alstroemeria are great for beginners due to their hardiness and availability. Baby’s breath and eucalyptus are excellent fillers and greenery. Choose seasonal flowers for freshness and affordability, and mix colors for visual appeal.
SEO Tips for Florists: Boosting Your Flower Arranging Content Online
If you’re a florist or content creator sharing flower arranging tips, optimizing your content for search engines can attract more readers. Here’s how to align with Google’s EEAT guidelines and improve your rankings, inspired by insights from floral SEO strategies:
- Keyword Research: Use tools like Google Keyword Planner to find terms like “how to make a flower arrangement” or “DIY floral centerpiece.” Long-tail keywords like “step-by-step flower arranging for beginners” have less competition and high intent.
- Quality Content: Write detailed, engaging guides like this one, incorporating personal stories and practical tips to establish expertise and trustworthiness.
- Local SEO: If you’re a florist, optimize for local searches (e.g., “florist in [Your City]”) by updating your Google My Business profile and using location-specific keywords.
- Image Optimization: Use high-quality images of your arrangements with descriptive alt text (e.g., “DIY rose and eucalyptus centerpiece”) to boost visibility.
For example, a blog post titled “10 Easy Steps to Create a Wedding Bouquet” could rank well for “wedding flower arrangement tutorial” if optimized with relevant keywords and rich content.
Pros and Cons of DIY Flower Arranging
Pros
- Cost-effective: Save money compared to buying pre-made arrangements.
- Creative freedom: Customize colors, styles, and flowers to your taste.
- Therapeutic: Arranging flowers can be relaxing and rewarding.
- Personal touch: Perfect for gifting or decorating special events.
Cons
- Time-consuming: Prepping and arranging flowers takes patience.
- Learning curve: Beginners may struggle with balance and proportion.
- Flower cost: Specialty blooms can be expensive.
- Maintenance: Arrangements require regular care to stay fresh.
Best Tools for Flower Arranging
For those looking to invest in quality tools, here’s a comparison of popular options:
| Tool | Brand | Price | Features | Where to Buy |
|---|---|---|---|---|
| Floral Shears | Fiskars | $15–$20 | Sharp, ergonomic | Amazon, Home Depot |
| Floral Foam | Oasis | $5–$10 | Soaks water, holds stems | Michaels, Amazon |
| Flower Frog | Japanese Kenzan | $10–$30 | Reusable, eco-friendly | Etsy, floral supply stores |
These tools are beginner-friendly and widely available, making them perfect for DIY enthusiasts.
Real-Life Example: My First Wedding Arrangement
I’ll never forget the time I made a floral centerpiece for my cousin’s wedding. Armed with a $50 budget and a YouTube tutorial, I hit the local farmer’s market for roses, baby’s breath, and eucalyptus. I spent hours trimming stems and wrestling with floral foam, but the result—a lush, romantic centerpiece—earned gasps from the guests. The bride’s smile was worth every minute of effort. That experience taught me that flower arranging isn’t just about technique; it’s about pouring your heart into creating something meaningful.
FAQ Section
How long does a flower arrangement last?
With proper care, most arrangements last 5–10 days. Hardy flowers like carnations can last up to two weeks with regular water changes and stem trims. Keep the arrangement in a cool spot away from sunlight.
Can I use flowers from my garden?
Absolutely! Garden flowers like roses, zinnias, or lavender are perfect for DIY arrangements. Just ensure they’re freshly cut and free of pests, and prep them like store-bought blooms.
What’s the easiest flower arrangement for beginners?
A simple round arrangement in a low vase is ideal for beginners. Use one type of focal flower (like roses), a filler (like baby’s breath), and greenery (like ferns) for a foolproof design.
How do I make my arrangement look professional?
Focus on balance and proportion, vary stem heights, and use a cohesive color palette. Step back often to check the arrangement from all angles, and don’t overcrowd the vase.
Where can I learn more about flower arranging?
Check out online tutorials on YouTube, take a local floral design class, or explore books like Floret Farm’s Cut Flower Garden by Erin Benzakein. Websites like FiftyFlowers also offer tips and inspiration.
Final Thoughts
Creating a flower arrangement is a delightful blend of art and science, accessible to anyone with a love for beauty and a bit of patience. By following these steps—gathering supplies, choosing flowers, prepping carefully, and designing with intention—you can craft stunning arrangements that rival professional florists. Whether you’re decorating for a special event or simply brightening your home, the process is as rewarding as the result. So grab some blooms, let your creativity bloom, and share your creations with the world—your masterpiece is waiting!